I have considered myself a “serious” still photographer for a long time. But, I enjoy doing video work as well. I like to have the best possible output I can. I’m appalled by what I see people post on YouTube – please edit out the parts where you’re walking along and the camera is recording your feet and the grass! (Several of the links below open on Amazon’s website. If you happen to buy it, I get a few cents. I’m now at just under $15 lifetime earnings!)
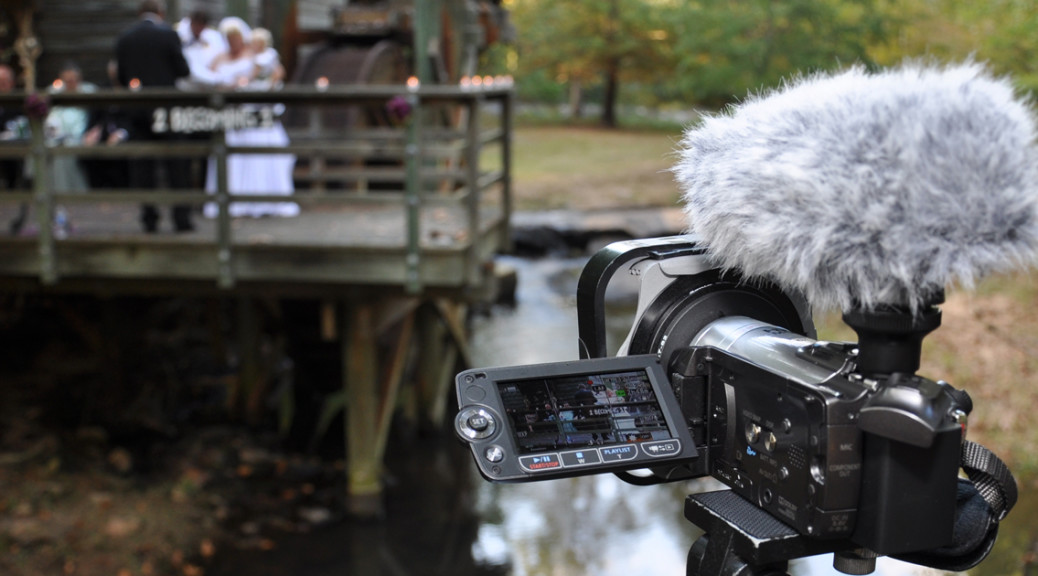
The picture above shows my efforts at making better video. Notice the camera is sitting on a tripod (it happens to be one I bought in high school as my better one was stolen a while back). On the front you will notice, from the left to right, a lens hood attached to a Cokin P-Series Filter Holder
 . Then comes a Circular Polarizer
 because what a polarizer can do for color quality and image control cannot be duplicated on the computer with “tweaks” or “digital filters.” A good one is not cheap, so this is sized to fit my largest Nikon lens and adapted to everything else with stepping rings. The last item before talking about the camera is the Canon DM-100 microphone
 that gives much better results than using the built in one. It records in stereo.
The Canon HF200 camera in the picture has been replaced . I learned a while back that most video camera manufacturers put some high end features on the entry level camera to compete for sales to schools. Schools often put out a request for proposals on a camera that must include an external microphone jack. This particular camera has a filter ring on the front and jacks for a microphone and for headphones. I use them all and wouldn’t buy a camera without them!
Want to make a better video?
Support the camera. When the camera moves, the picture moves. Do you really want the picture jumping up and down and rolling left and right? If you actually have the talent to pull this off, you don’t need my tips! You can support the camera in many ways. Tripods work really well, but are bulky and can be inconvenient. In a restaurant you can rest the camera on top of a glass. Outdoors, lean against a wall, fence, or a car and tuck your elbows in tightly. You can also support the camera by bracing it against a light pole. Any time the camera is resting on, or pressed against a solid object, you remove at least one of the three dimensions in which it can inadvertently and unattractively move.
Let the subject move, not the camera. Zooming during recording rarely works well. Zoom to get the shot you want, then leave that button alone while recording. “Moving” pictures of things that are not moving are not very, uh, “moving.” With practice you can pan smoothly along the front of a building, but sometimes you can solve the problem by waiting for a car to drive by. If you want to move the camera, consider moving to a different spot for a different point of view!
Get as close as you can. This lets you fill the screen with your subject and reduces distracting background clutter. If skilled filmmakers think in terms of wide, medium, and close shots, I think most beginners end up with wide, wider, and just too darn far away shots.
Improve the sound. You will find many references pointing out that people will tolerate mediocre video if the audio is good. If all you have is the camera’s built-in microphone, try to turn off as many extraneous noise sources in the room as you can. The camera’s microphone isn’t really “bad.” It’s so good that it can pick up everything in the room – your subject, your breathing, your TV in the background… If your camera has a microphone jack, get a lavalier microphone like you often see on the collar of people being interviewed on TV. These start as low as $20 if you get one from Radio Shack. For a camera without a microphone jack, you can hold a smart phone or a digital recorder close to your subject, but out of the picture, and easily learn how to add the audio in during the editing process. With the right adapter(s), you can connect the lavalier to your cell phone if the “talent” is too far from the camera. I have a Canon DM-100 shotgun microphone that I use frequently.
Have a plan for a story in mind. A short video for a birthday might start off with a “happy birthday” banner, then show someone bringing in a cake while singing, followed by a close up of blowing out the candles, and so on. Hollywood can turn a 1000-page book into a two-hour movie and people follow the story; you can show a birthday party from poster to presents in three minutes with some planning and editing.
Shoot a lot of footage, then delete most of it. Your editing software is you friend. The camera usually wiggles a bit when you start/stop recording. Cut that part off. Many scenes on TV are only 10-15 seconds before the camera changes. Ten different shots of a birthday party might only total 150 seconds (2-1/2 minutes) yet give you a nice tight video. I’ve read that people move on to the next video in less than three minutes. If your work is good, they will stay. Reward your viewer by getting rid of surplus footage.
Let there be light, in the right places. When you are beginning, it’s hard to think about “light,” let alone take steps to control it. In general, you want as much light as you can possible have on the subject, but not behind it. Try to keep the sun behind you until you can some skill. Turn on as many lights indoors as possible that are between you and the subject, but minimize the light behind (lamps, open curtains, etc.) to avoid a subject in shadow.
Composition is important. Read about the rule of thirds. Allow room between people’s faces and the edge of the frame. Look for diagonal or curved lines to lead you to the subject. Move around so different scenes are shot from different points of view. If you shoot more than one scene from the same spot, zoom in or out some or change the angle up/down or left/right enough that it’s a real change and not just a jarring bump when your viewer sees it.
Am I a great videographer? No, definitely not. However, I do try to take steps to make my work a bit better when I can. A few years ago, I had two coworkers die within a few months of each other. We had a memorial service for each of them at the base chapel. I did videos of the events for the families. I put a camera in the choir loft looking down at the front of the church. I put a camera in the front pew looking at the lectern. I used a third camera to film people in the pews as they listened/reacted. I recorded audio from the church’s mixer into my iPad. What did I learn from this? Some useful things, for sure: there is a difference between line level and microphone level that you need to understand when connecting things to each other. There is a difference between TRS and TRRS that’s more important than just “one more R” in the second one. And, if an SD card isn’t fast enough, you can’t record HD video (Try figuring that one out when everyone is waiting for you to be ready so the service can start!)